Documentation (v4.14.0)
Table of Contents
- Getting Started
- The Capacity Chart
- Integration of CapaPlan
- The CapaPlan Window
- How to use CapaPlan
Getting Started
What is CapaPlan?
CapaPlan is a software tool offering development planning and forecasting for a single team or also multiple development teams. It has on an intuitive visual representation and a simple usability, which means that different planning alternatives can be modeled within minutes. This way, CapaPlan is supporting the decision-making process as well as a transparent communication to team members and other stakeholders.
You may visit the CapaPlan website at https://www.capaplan.net/
Download CapaPlan
Download the latest version of CapaPlan from https://www.capaplan.net/.
Right now, CapaPlan is available for Windows only. However, support for other operating systems (Linux, MacOS) is possible as well. Please send an email to info@capaplan.net in case you are interested in us supporting further operating systems.
Install CapaPlan Using the Installer
Download the installer, then run the executable binary and follow the installation flow.
The Capacity Chart
The capacity chart is a visual representation of development tasks which are planned to be realized by a development team within a certain period of time. The capacity chart has two axes: The x-axis is representing the time and the y-axis is representing the capacity of the team (e.g., hours or story points). By putting the tasks along this x-axis tasks can be planned at a certain point in time and with a certain duration. In addition to that, by giving the task a height, one defines the capacity the team will be working on this particular task. Compared with other representation (e.g., Gantt chart) a capacity chart does not only show the points in time the different tasks will start and end, but also the overall team capacity and describes how much of the team's capacity is allocated to the different tasks.
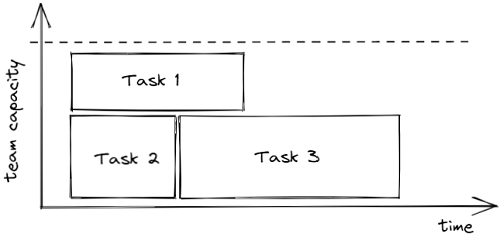
CapaPlan's underlying assumption is that a development team has a relatively stable average capacity over time. Another assumption is that the time to realize a feature can be approximated as

Based on these assumptions, it becomes possible to represent a team's development tasks in a capacity chart. The user can move tasks around to define the point in time the task starts. By allowing the user to modify the height of the tasks, the allocated capacity can be defined and CapaPlan can then conclude on the duration of a task on the capacity chart. Please note that CapaPlan does not define the unit to measure effort or the team capacity, apart from requiring that it is measured in natural numbers. Hence, the user is free to choose anything like hours, story points, function points...
Integration of CapaPlan
Typically, CapaPlan will be used by a development organization which uses a project management tool to keep track of development tasks. In such environemnt CapaPlan will integrate nicely by allowing references to task in the project management system. Furthermore, CapaPlan allows the creation of plug-ins which then can handle automatic data exchange between CapaPlan and the project management system (for example, automatic update of task efforts or target dates). By writing plug-ins, it is also possible to feed back information from team plans in CapaPlan to the project management system.

An example of such project management tool is Jira. CapaPlan has proven to integrate nicely with Jira, and this documentation will sometimes refer to Jira and its terminology. However, this is only to give examples on how CapaPlan plays along with a given project management system, and it is expected that integration with other systems on the market will work similarly.
The CapaPlan Window
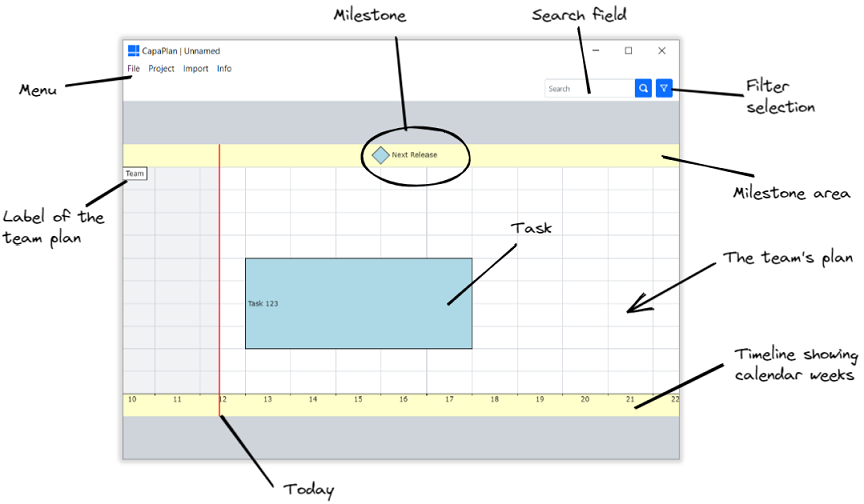
The following picture shows important regions and controls which are visible in the CapaPlan window:
Changing the Viewport
The viewport of the CapaPlan window can be modified by using the following controls:
| Action | Controls |
|---|---|
| Move viewport left/right along the timeline | ctrl + move mouse to right/left |
| Move viewport up/down (in case the chart is no fully visible) | ctrl + move mouse down/up |
| Zoom in/out | Mouse wheel ctrl + + / - |
How to use CapaPlan
Working with Tasks
Representation of Tasks in the Chart
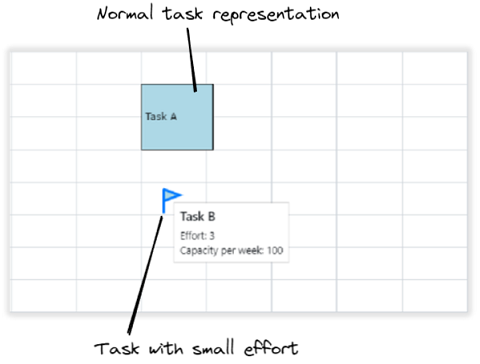
In the capacity chart a task is normally represented as a block. However, if the (remaining) effort of a task is very small or in case the effort is even zero, then this representation works less well. Therefore, CapaPlan visualizes tasks below a certain threshold with a flag icon. The threshold can be chosen in the Project Settings.
Creating a new Task
Right-click on the team plan and in the context menu select Create task. A dialog will open up where the details for this task can be specified. Mandatory information to be specified is a title and an effort greater than zero.
| Field | Information |
|---|---|
| Title | The title of the task. |
| Effort | A non-negative number for the (remaining) effort in this task. |
| Target date | The date until which the task shall be finalized. It can be expressed as a calendar week (e.g., 12/2022) or in the form of a date (e.g., 2022-10-24). |
| Reference ID | Reference to an element in an external system which relates to this task in CapaPlan. An example could be the ID of a Jira Epic. |
| External link | A URL which will be opened up in the browser when double-clicking the task in CapaPlan. This can be used to direct the user to a web location with more information for this task on the plan. If for example a task is associated with a certain Epic in Jira, then it would make sense to use here the URL of this Epic. |
| Tags | A comma-separated list of tags which apply to this task. |
Selecting a Task
When a task is clicked with the left mouse button, it will be selected. It is also possible to select multiple tasks by either holding the left mouse button and spanning a selection area, or by left-clicking one task after the other while keeping the shift-key pressed.
Moving a Task
A task can be moved by selecting it with the left mouse button and moving the mouse while keeping the left button pressed. In case multiple task are selected, it is also possible to move multiple tasks at once.
Removing a Task
Right-click on the task and in the context menu select Remove. In case multiple tasks are selected it is also possible to remove multiple tasks at once. Another possibility to remove one or multiple selected tasks is to hit the del-key.
Editing a Task
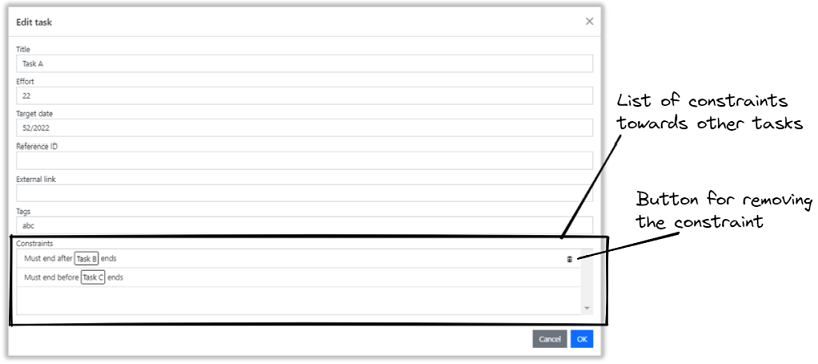
Right-click on the task and in the context menu select Edit. A dialog will show up which has the same fields as the dialog for creating a new task. In addition to that, in case the task has constraints towards other tasks, the lower part of the dialog will have a list showing all constraints.
Changing the Assigned Capacity of a Task
By left-clicking the area at the top or bottom of the task and moving the mouse up- or down, the height of the task can be changed. As the height on the plan is associated with a certain capacity, this will lead to a different capacity being assigned to the task. The changed capacity will directly influence the width of the task, indicating the time until when the task will be finalized. For further explanation of the underlying concept, see here.
Overlaying a Task with Another Task
Tasks can overlay each other and the result will be that the task which is below the other task will be extended accordingly. It is possible to modify the rank of a task (if it is above or below other tasks) by clicking it with the right mouse button and then in the context menu choose Bring to front or Send to back.
Moving Tasks Between Plans
If the project has at least two plans: right-click on the task and in the context menu select Move. A dialog will show up which will allow the selection of a plan where the task shall be moved to.
Duplicating Tasks
Right-click on the task and in the context menu select Clone. A dialog will show up which will allow the selection of a plan where the cloned task shall be placed in.
Importing Task Data from JSON File
As mentioned above CapaPlan allows deep integration with other systems via plug-ins which then can directly interact with available APIs. Alternatively, a very simple and straight forward way to update tasks in the plan is to provide the information via a file in JSON format. For importing such JSON file, in the menu select Import and then Import Task Data. A dialog will appear that allows you to select a JSON file. After selecting the JSON file, another dialog will appear allowing the selection of the data which shall be taken over in the current project.
The JSON file must have the following structure. Note that the extRef attribute must match to the reference ID property of the task, which shall be updated with the new information.
[
	{
	"extRef":    "ID-1234",
	"title":     "My new title",
	"effort":    22,
	"targetEnd": "12/2022",
	"linkUrl":   "http://www.foo.bar"
	},
	...
	]
Working with Task Groups
Task groups bundle two or more tasks into a single task element on the team plan. A task group behaves similar to a normal tasks on the team plan, but will have the combined effort of all tasks it contains. Also, the target date will be automatically set according to the earliest target date of all containing tasks.
Creating a new Task Group
Select two or more tasks and then right-click on one of these tasks. In the context menu, select Group. A dialog will show up where the details for this task group can be specified. With the input fields on the top, the properties of the task group itself can be defined (see below). Here, the only mandatory information is the title. On the bottom left is a list view which shows the tasks which are part of this group. On the right, the properties of the task which is selected in the list view can be modified. The input fields to modify the properties of the task are the same as in the dialog for creating a new task.
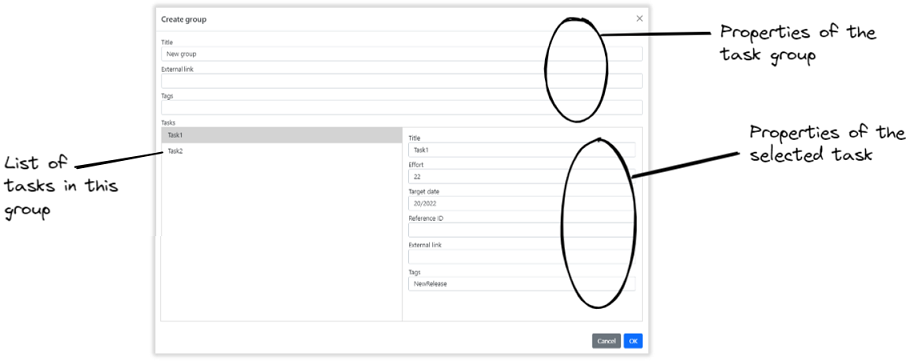
| Field | Information |
|---|---|
| Title | The title of the task group. |
| External link | A URL which will be opened up in the browser when double-clicking the task group in CapaPlan. |
| Tags | A comma-separated list of tags which apply to this task group. |
Editing a Task Group
Right-click on the task group and in the context menu select Edit. A dialog will show up similar to the one when creating a new task group which allows a modification of the task group.
Adding a Task to a Task Group
Select the task together with the task group. Then right-click on either the task or the group and in the context menu select Add to task group.
Ungrouping a Task Group
Right-click on the task group and in the context menu select Ungroup.
Removing a Task Group
It is not possible to remove a task group with all its containing tasks directly. Instead, you must first ungroup the task group. Afterwards, you can remove the individual tasks from the team plan.
Working with Team Plans
CapaPlan is designed to allow the handling of one plan for a single team, but also the handling of several plans of different teams at once.
Managing Teams
In the menu, select Project and then Manage Teams. A dialog will show up which allows the user to create or remove team plans, and also to modify existing team plans. The settings area for a team plan shows two tabs: In the first tab the profile of the team plan is defined, and in the second tab it is possible to configure periods where the team's capacity deviates from the average capacity.
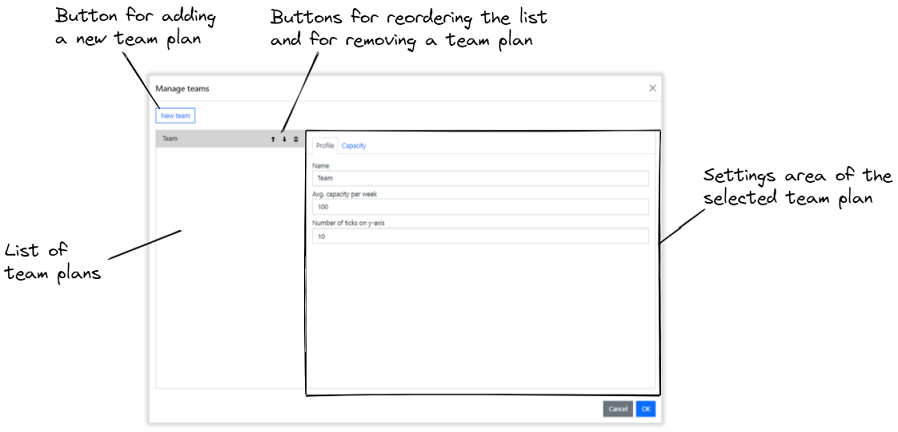
Profile Tab
This tab allows the definition of the team plan profile. All fields are mandatory.
| Field | Information |
|---|---|
| Name | The name of the team. |
| Avg. capacity per week | A positive number indicating the average capacity of the team in a single week. |
| Number of ticks on y-axis | A positive number indicating the number of ticks the team's plan shall have. This number thus defines the granularity with which capacity can be allocated to each task in the plan. A suitable number here can be the number of people in the team or double the number of people in the team. |
Capacity Tab
In this tab, it is possible to create new or modify existing periods where the team's capacity deviates from the average capacity specified in the profile tab. All fields are mandatory. Note, that as of now, it is only possible to define capacity reductions (negative deviations).
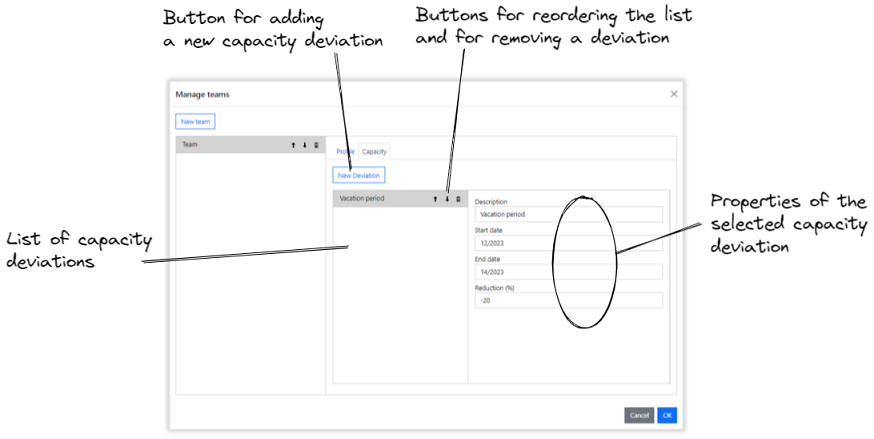
| Field | Information |
|---|---|
| Description | A description or title for this deviation. |
| Start date | The date where the period starts. It can be expressed as a calendar week (e.g., 12/2022) or in the form of a date (e.g., 2022-10-24). |
| End date | The date where the period ends. It can be expressed as a calendar week (e.g., 12/2022) or in the form of a date (e.g., 2022-10-24). |
| Reduction (%) | The capacity reduction in percentage stated as negative number. |
Importing Team Plans
From the menu, select Import and then Import Team Plan. A dialog appears that allows you to select a CapaPlan project (.capa file). After selecting a project, another dialog will appear, allowing selection of one of the team plans in the project to be imported into the current project.
Working with Milestones
Creating a new Milestone
Right-click on the milestone area and in the context menu select Create milestone. A dialog will open up where the details for this milestone can be specified. Mandatory information to be specified is a title and a date for the milestone.
| Field | Information |
|---|---|
| Title | The title of the milestone. |
| Date | The date can be expressed as a calendar week (e.g., 12/2022) or in the form of a date (e.g., 2022-10-24). |
| Tags | A comma-separated list of tags which apply to this milestone. |
If there is already a milestone at the same date where the new milestone shall be created, then both milestones will be merged. This means that the merged milestone will have a title which combines the titles of the two milestones. Also, the list of tags will be merged.
Editing a Milestone
Right-click on the milestone and in the context menu select Edit milestone. A dialog will show up similar to the one when creating a new milestone which allows a modification of the values.
Removing a Milestone
Right-click on the milestone and in the context menu select Remove milestone.
Selection of Active Tags for a Milestone
It is possible to set the selection of active tags to match exactly the tags of a certain milestone. For this, right-click on the milestone and in the context menu select Appl tags filter.
Project Settings
In order to change the settings of the project, go to the menu and select Project and then Settings. A dialog will show up allowing you to change the project settings.
| Field | Information |
|---|---|
| Cell dimension ratio (x:y) | This parameter defines the appearance of the grid within the team plan. It defines the ratio between the width (x) and the height (y) of a single cell. |
| Min. effort for showing a task as a block | This sets the threshold for showing a task as a block on the chart. If the effort of a task is below this value, the task is represented by a flag icon. |
| First work day of the week | This sets the first work day of the week. For example, if Monday is not a typical day of work, you would set this field to Tuesday. |
| Number of work days per week | This field sets the number of work days per week. For example, if you normally work from Monday to Friday, you would set this field to 5. |
| Tag colors | Comma-separated list of color definitions for different tags. These colors will be used for drawing tasks or milestones in case they specify one of these tags as the first tag in the list of applicable tags. The colors are expressed as web colors in hexadecimal notation. |
| Planning horizon (weeks) | If set, a mark will be shown on the chart indicating a planning horizon n weeks from today. |
| Don't allow tasks in the past | If this option is selected, it will be prevented that tasks are placed in the past. |
Planning Constraints
CapaPlan can track different planning constraints:
- A task shall be done prior to a certain milestone. A task is considered to belong to a milestone if both the milestone and the task have at least one matching tag.
- A task shall be done prior to its specified target data.
- A task shall be planned in a way that is consistent with the planning constraints towards one or more other tasks.
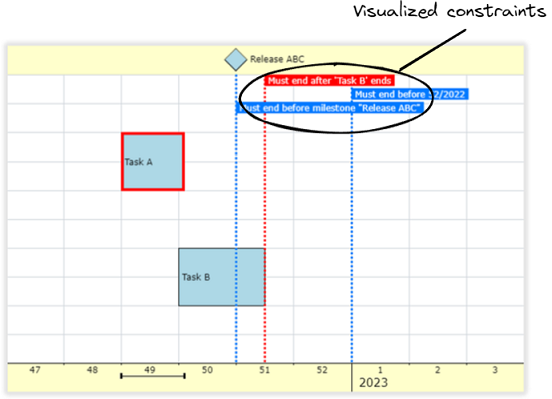
Planning Constraints Between Tasks
Planning constraints between tasks can be created by selecting exactly two tasks. Then right-click one of them and in the context menu select Create constraint. A dialog will show up where a constraint can be chosen. All constraints of a task are listed in the dialog for editing the task. In this dialog it is also possible to remove constraints.
Change History
CapaPlan keeps track of changes and allows you to roll back in case you made a mistake. For undo/redo go to the menu, select Project and then Undo or Redo. The respective shortcuts are ctrl + Z for undo and ctrl + Y for redo.
Searching Tasks
Type part of the title or of the reference ID of the task you are looking for into the search field and press enter. In case there are matches, the matching tasks will be highlighted and the viewport will snap to the first matching task.
Filter Tags
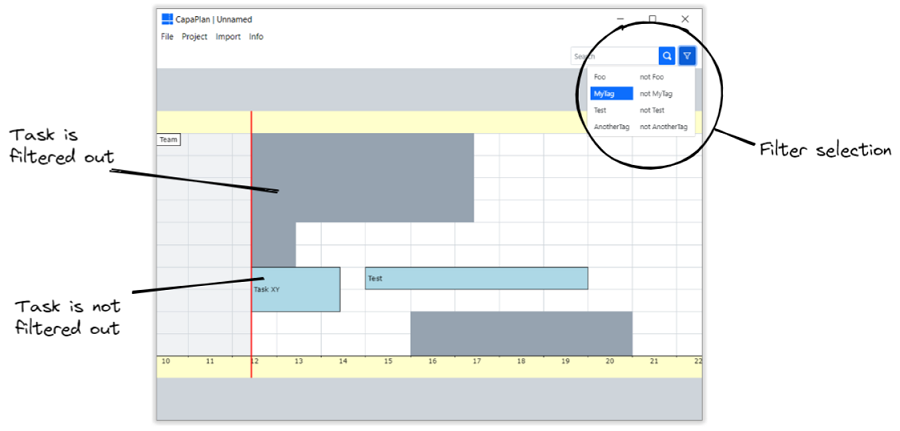
Both task and milestones can be associated with tags and if at least one tag is set in the project, then it becomes possible to set a filter via the selection control in the upper right corner of the CapaPlan window. Depending on this selection, tasks and milestones in the project will be filtered out. A Task or milestone which is filtered out, is shown in gray color and cannot be selected or manipulated on the plan.
Cycling Through Selected Tasks
It can be difficult to select a task with the mouse pointer when the task's representation on the chart is very small. In such case the function for cycling through a group of selected tasks can be helpful. This function gives the user the possibility to select more than one task within a certain area of the chart and then choosing one out of this group by repeatedly pressing the Tab key.